This page is about CivBuddy version 1, which has been superseded by version 2.
CivBuddy v1
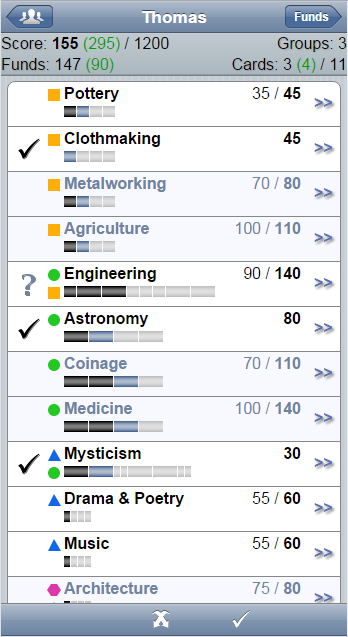
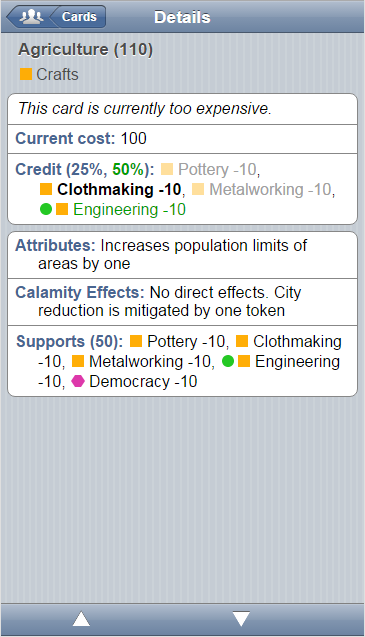
Feature-wise, v1 already had most of what v2 can do, but the UI was very different:


CivBuddy v1 is still deployed (link), but no longer maintained, so you may see some parts of it start to fail.
Development Setup
v1 is no longer maintained, but for completeness’ sake, here is how to set it up for development.
Building CivBuddy v1
In order to build CivBuddy v1 yourself, follow these steps:
- Make sure you have the prerequisites set up:
- Git
- Java 6 SDK
- Java 7 SDK - Both Java 6 and 7 are required to build CivBuddy. This is because the build needs Java 7, but GWT requires Java 6.
- Chrome. Yes, development of a GWT program requires Chrome these days.
- Make sure that your environment variable
JAVA_HOMEpoints to the Java 7 SDK, for exampleC:\PROGRA~1\Java\jdk1.7.0_80(Windows). JAVA_HOME/binshould be on thePATHas first entry. Runjava -versionto check that it’s Java 7.- If you don’t have a Gradle User Home yet, set it up by creating an empty directory called
.gradlesomewhere, for exampled:\.gradle(Windows) or~/.gradle(Unix). Create an environment variableGRADLE_USER_HOMEwhich points to this directory. This directory may grow quite large over time (mine is 8 GB), because Gradle uses it to cache all its downloaded stuff. -
Create an empty text file in
GRADLE_USER_HOMEcalled gradle.properties. Inside, add the following lines:org.gradle.daemon=true civbuddy_jdk6_javac=C:/PROGRA~1/Java/jdk1.6.0_45/bin/javac.exe civbuddy_jdk6_javadoc=C:/PROGRA~1/Java/jdk1.6.0_45/bin/javadoc.exeThe
civbuddy_jdk6_javacmust point to the Java 6 compiler executable (adjust this depending on where you installed your Java 6 SDK), and should not contain spaces. The same goes forcivbuddy_jdk6_javadoc. The daemon setting is optional and may be left out if you so desire. -
Clone the CivBuddy repo by running on the command line:
git clone https://github.com/tsjensen/civbuddy.git cd civbuddygradlew buildThis will take care of everything needed for a successful build of CivBuddy, including download and installation of Gradle.
Running CivBuddy v1 locally
In order to run CivBuddy in development mode, follow these steps:
- Make sure that CivBuddy was built ok in accordance with the above.
-
Now, run
gradlew jettyDraftWar. The WAR file will be assembled and a Jetty application server started. Don’t worry about any installation or configuration effort, that’s all taken care of by Gradle. The build will appear suspended at a line something like this:> Building 83% > :jettyDraftWar > Running at http://localhost:8080/civbuddywhich is good; it means your Jetty server is running fine. Just leave it at that.
-
In a new shell, run
gradlew gwtSuperDev. Super Dev Mode is required these days in order to develop a GWT program. The original development mode which was based on browser plugins is no longer supported by GWT. The output should include a line something likeThe code server is ready at http://localhost:9876/and subsequently remain “stuck” like the previous call. This is good, it means Super Dev mode is up and running!
- Start Chrome and navigate to
http://localhost:8080/civbuddy, the address at which your Jetty server is listening. - From the Chrome menu, select More tools → Developer Tools or press Ctrl+Shift+I to call up the development environment. You can browse the sources, debug them, or view the application log from here.
The CivBuddy code as found on GitHub is IDE agnostic, so you may use your favorite IDE to edit the sources. The IDE may run on a newer JDK; just make sure that the project’s JDK is on version 6. IDE specific control files are never committed to git. In order to activate changes from your IDE in Super Dev Mode, press Compile on the Dev Mode On bookmarklet as described in the Super Dev Mode docs.